−Table of Contents
The ImageJ Eclipse Howto
A guide on how to include ImageJ into Eclipse and develop plugins using this IDE.
Author: Patrick Pirrotte (patrick@image-archive.org)
- Tested under Eclipse 3.4 (Ganymede), Eclipse 3.3 (Europe), 3.2 and 3.1.2 (on Windows XP 32/64, Vista 32/64, MacOS X.2 and Linux).
- ImageJ depends on tools.jar, you need to install the Sun Java Developers Kit. The JRE is not sufficient to compile ImageJ.
There are many different methods to include ImageJ into Eclipse to develop plugins. Four of them are described in this document. The recommended way is described in Method 1), while Method 4) is faster to setup for a quick hack.
Method 1: Setting up Eclipse to create and debug plugins for ImageJ
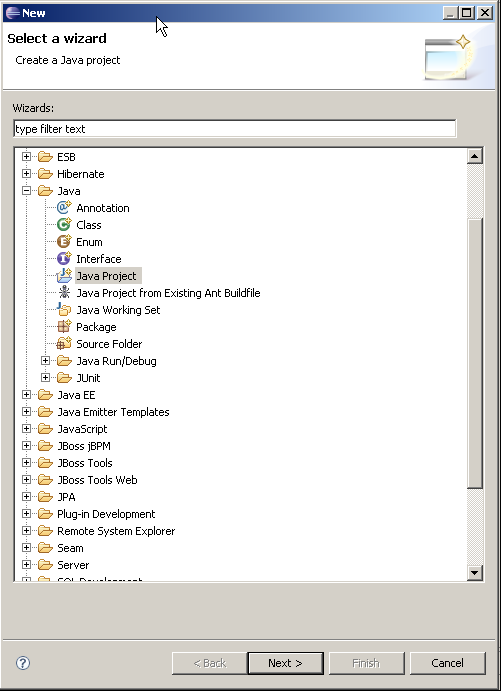
- Alt-File –> New
- Select the Java Project wizard and click Next
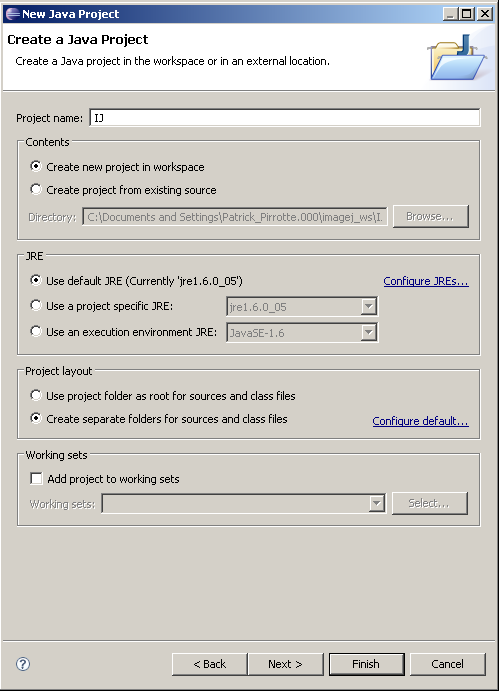
- Project name: IJ. Check Create separate folders for sources and class files. Click Next
- On the following panel, select Source tab and check if Default output folder is set to IJ/bin
- On the Libraries tab click on Add external JARs, browse to your Java SDK library folder , select tools.jar, click Ok and click on Finish to create the project.
(on my computer the Java SDK library folder is located at C:\Program Files\Java\jdk1.6.0_02\lib)
- Finally, get the latest copy of ij here, extract the zip
- Copy the ij folder and its subfolders into the source folder
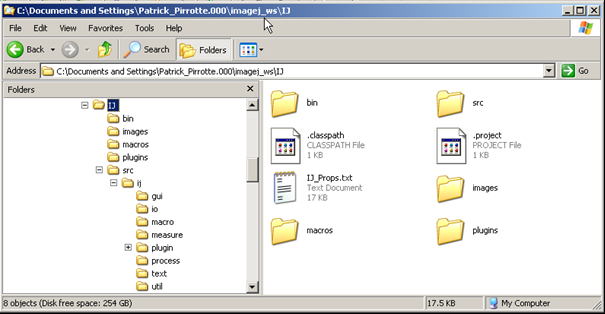
- Copy the images, macros and plugins folder and only IJ_Props.txt to the IJ project root.
- Click on F5 to tell Eclipse to refresh its Package list
Create a new plugin (or import your previously developed plugins).
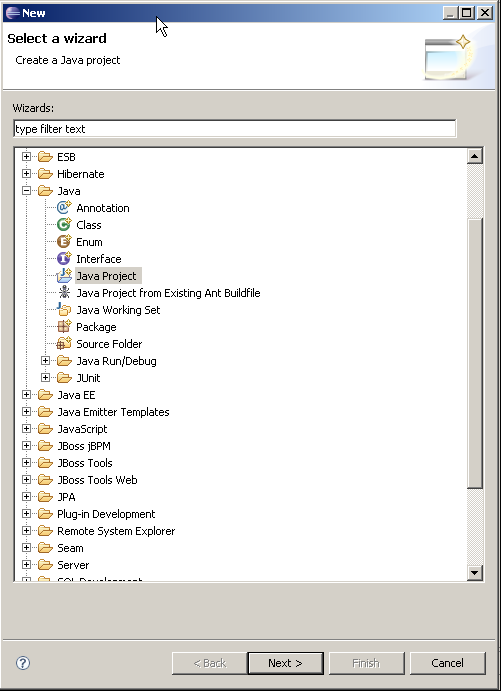
- Alt-File –> New
- Select the Java Project wizard and click Next
- Give your plugin a name (don’t forget to add an underscore if you want it to appear in the ImageJ menu!)
- On the Source tab, check that the output folder is set TestPlugin_/bin
- On the Project tab, click Add… and select your previously created IJ project containing the ImageJ source.
- Click Finish
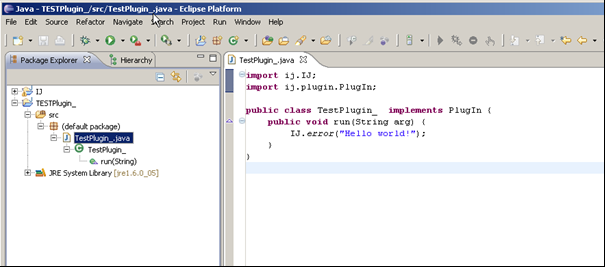
- Create your Java plugin files. In our example, I created a sample TESTPlugin_.java with the following content:
import ij.IJ;
import ij.plugin.PlugIn;

public class TestPlugin_  implements PlugIn {
	public void run(String arg) {
		IJ.error("Hello world!");
	}
}
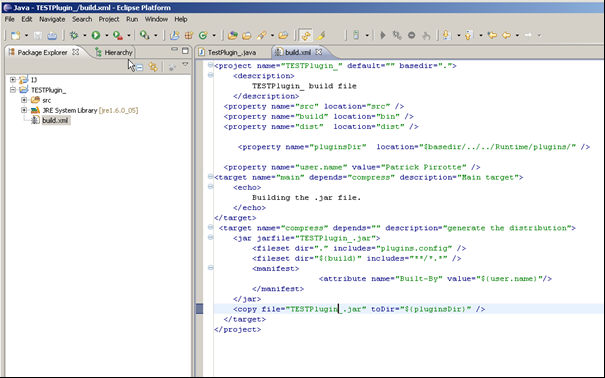
- Create a file called build.xml in the project root folder. A sample build.xml file follows, which you should adapt to your needs.
<project name="TESTPlugin_" default="" basedir=".">
    <description>
        TESTPlugin_ build file
    </description>
  <property name="src" location="src" />
  <property name="build" location="bin" />
  <property name="dist"  location="dist" />

	 <property name="pluginsDir"  location="$basedir/../../IJ/plugins/" />

  <property name="user.name" value="Patrick Pirrotte" />
<target name="main" depends="compress" description="Main target">
	<echo>
		Building the .jar file.
	</echo>
</target>
 <target name="compress" depends="" description="generate the distribution">
 	<jar jarfile="TESTPlugin_.jar">
 		<fileset dir="." includes="plugins.config" />
		<fileset dir="${build}" includes="**/*.*" />
 		<manifest>
 		 	 	      <attribute name="Built-By" value="${user.name}"/>
 		</manifest>
 	</jar>
    <copy file="TESTPlugin_.jar" toDir="${pluginsDir}" />
  </target>
</project>
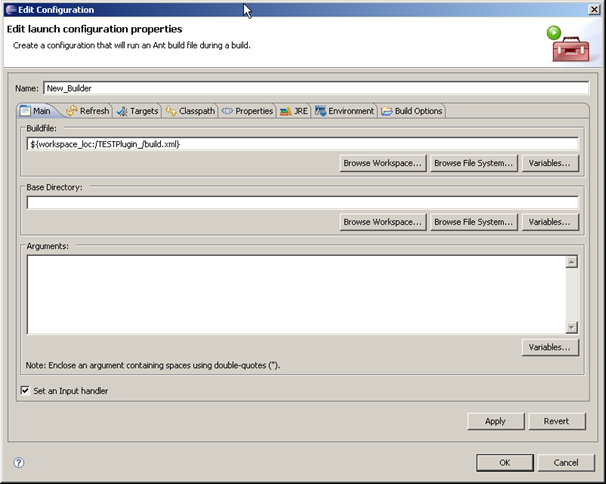
- In the Package Explorer, right click on the TESTPlugin_ project, click on Properties, select Builders, click New… and select Ant Builder
- In the Main Tab, click Browse workspace and select the build.xml from your TESTPlugin_ project.
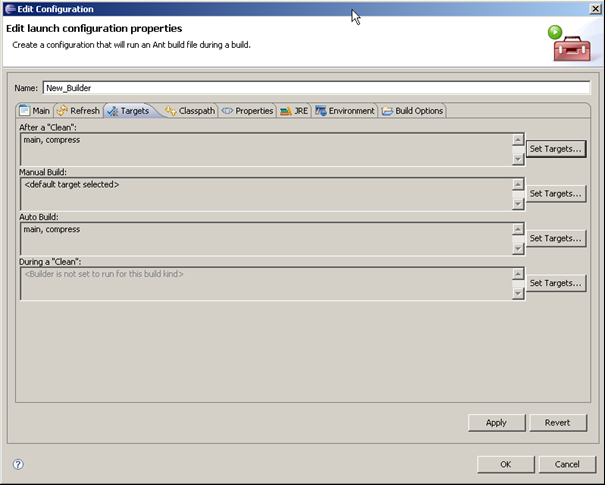
- In the Targets tab, click Set Targets for both After clean and Auto build targets, and select both main and compress.
- Click Ok twice to keep your changes.
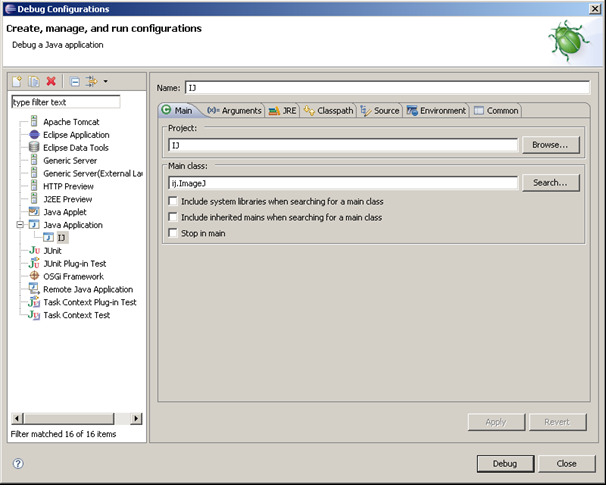
- Goto Run→ Debug Configurations and create a new Java Application Debug Configuration. Fill in IJ In the field Project, and ij.ImageJ in the field Main class.
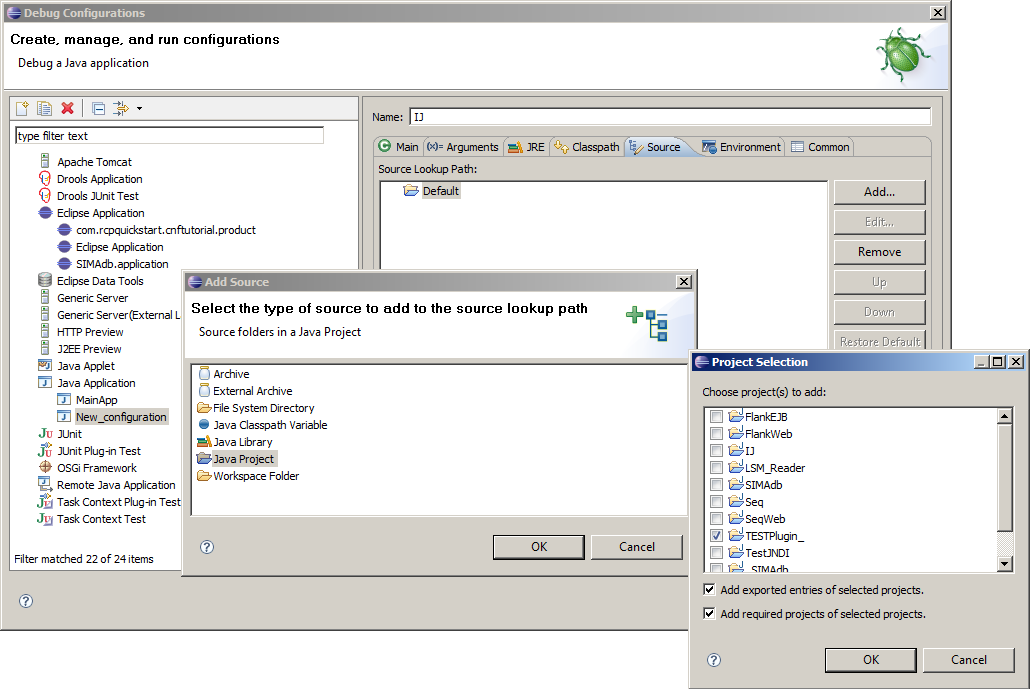
- Select the Source tab, then in the Source lookup path, Add→Add Java Project. Select the TestPlugin_ project. This step is crucial if you want to step into your plugin source during the debug phase. Apply the changes.
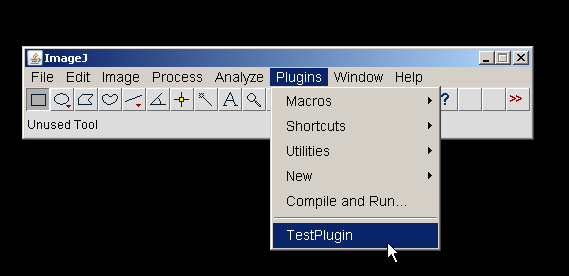
- If you select Debug, ImageJ will start and your TESTPlugin_ will show up in the Plugins menu…
- Set breakpoints in plugins or in the ImageJ source, the debugger should break accordingly.
Method 2: Importing the ImageJ source, using Eclipse's own build mechanism
Installing the source into Eclipse will allow you to quick-jump between ImageJ classes and your own plugins. It's really really useful to browse through the ImageJ API inside Eclipse.
- first of all grab an ImageJ source from the ImageJ website http://rsb.info.nih.gov/ij/download/src/. Usually the latest release is fine take but for stability reasons you may wish to download earlier versions belonging to the stable release which is usually a few month behind the bleeding edge bimonthly releases.
- in Eclipse create a new project (File → New → Project), select Java Project and click Next> [fig 1]
- Fill in a project name, e.g. ij and click Next [fig 2]
- in the source tab of the Java Settings for your new project, select Allow output folders for source folders and fill in ij/bin in the Default output folder [fig 3]
- in the Librairies path click on Add External JARs, browse to your JDK, go to the lib folder and select tools.jar. It should appear as below in [fig 4]
- Click Finish.
- unzip the ImageJ source code you downloaded previously into a temporary folder and copy the source/ij folder into your newly created project source folder. On my computer it is located at C:\Documents and Settings\Patrick_Pirrotte\workspace\ij.
- In Eclipse, right click on the ij project and click Refresh. This will refresh the file tree, and make the newly copied source code visible to Eclipse.
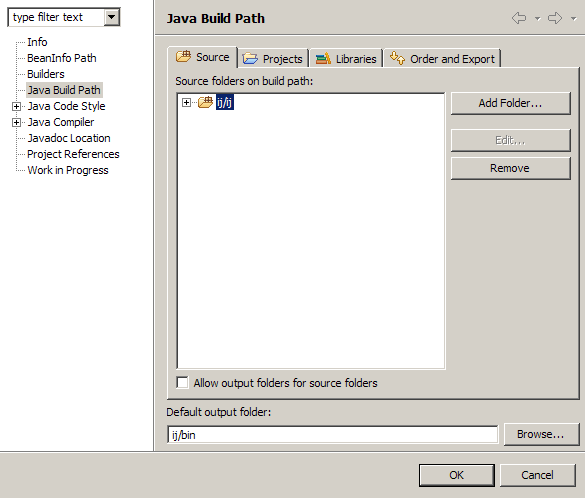
- In Eclipse, right click on the ij project and click on Properties. Go to build path and select the source tab. You'll have to remove the old source folder (Click on ij –> Remove) and add the newly copied source folder (Click on Add, point to ij/ij). [fig 5]
- At this stage you have successfuly imported ImageJ into Eclipse. The rest is a breeze…
- Simply create a new project for your plugin. You know how now (see fig 1 and fig 2, you can name your project as you wish.).
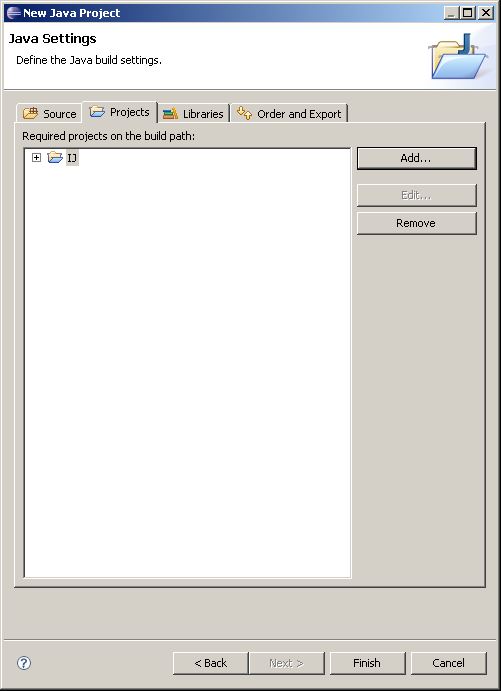
- In the Java settings, select the Projects tab and Add ImageJ as a project to the build path [fig 6].
- Click on Finish, that's it.
You can program your plugins which will be compiled against the ImageJ source code. To export your plugin go to File→Export and select JAR, export the jar to your ImageJ plugins folder.
Method 3: Importing the ImageJ source, using ImageJ build.xml, building with ant
(an alternative way proposed by Andy Weller)
[TODO: SCREENSHOTS WILL FOLLOW]
- Download latest source and unpack somewhere known (ie, Desktop).
- In Eclipse create new “Java Project from Existing Ant Build”.
- Locate “build.xml” from unpacked source and click “Finish”.
- In “source” folder from unpacked source copy everything minus the “build.xml” to the newly created eclipse folder. (On my Linux machine, this is “/home/aweller/.eclipse/ImageJ”.)
- In Eclipse, right click on the new “ImageJ” package and “Refresh”.
- Again right click on the new “ImageJ” package, select “Properties”, “Libraries” and “Add External JARs” and add “tools.jar”.
- Again do a “Refresh” of your ImageJ project.
- Voila - it's all there! If you “Run” the “build.xml” file, you'll run ImageJ.
Method 4: Importing the ImageJ jar, no source browsing unless separate import of ImageJ source
[TODO: SCREENSHOTS WILL FOLLOW]
You could basically add the ij.jar file as a library to your plugin as seen above. From this point on you'll be able to develop ImageJ plugins. To enable ImageJ source code browsing you will have to attach the source code to the freshly imported ij.jar. (thanks to Aaron Ponti for this tip)
- right-click on ij.jar in the Package Explorer
- click on Properties
- click on Java Source Attachment and click on “External Folder”. Select the directory where you extracted your ImageJ source code to. It seems that you can also point to imagej-src.zip directly by selecting “External File” and Eclipse does the job of extracting the class definitions. UNTESTED
- click on Ok.
You should now be able to navigate through the ImageJ source code as if you had created a standalone project for ImageJ itself.
Any improvements or bugs? Send me your comments (patrick@image-archive.org)

