−Table of Contents
Hill Shade
Produces relief shading as in topographic maps, assuming that the pixel value is the height of a surface at the given position (x, y).
Description
The plugin needs an 8-bit, 16-bit or float (=32-bit) input image; pixel value (height) calibration of 8-bit and 16-bit input images is taken into account. The plugin produces a new 8-bit grayscale output image, irrespective of the type of input image. Preview is shown as an overlay of the input image, however.
The math behind it: When 'Nonlinear Contrast' and 'Half Brightness for Flat Areas' are off, the brightness of the output image is proportional to the cosine of the angle between the direction perpendicular to surface and the direction to the light source (sun), i.e., the surface is shows Lambertian reflectance. If that angle is 90 degrees or more, i.e. if the slope that is directed away from the sun, the output is black. It is assumed that the “Mountains” do not cast a shadow, however.
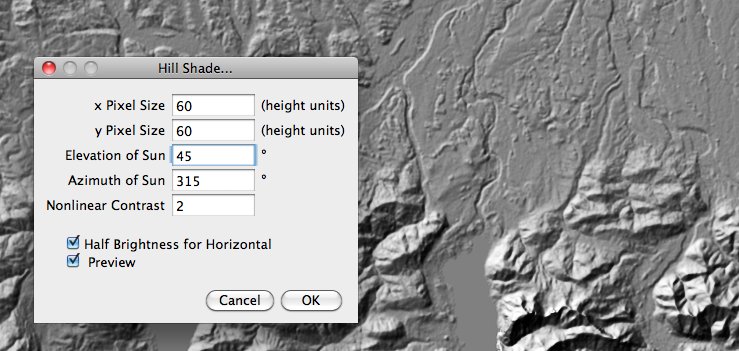
Dialog parameters
- x Pixel Size - Size of one pixel in x direction, in the same units as the height (pixel value).
- y Pixel Size - Size of one pixel in y direction, in the same units as the height (pixel value).
- Elevation of Sun - height of the light source in degrees, typically between 30 and 60
- Azimuth of Sun - direction to the light source in degrees, 0 is north, 90 east etc.
- Nonlinear Contrast - when > 0, contrast for gentle slopes gets enhanced. Typical values are 1-5.
- Half Brightness for Horizontal - when selected, a gamma correction is applied to the output, such that a horizontal plane will appear with half brightness (pixel value = 128), irrespective of the elevation of the sun. When not selected, the pixel value of a horizontal plane will be roughly 256*sin(Sun_Elevation). In that case, a horizontal plane gets half brighness only at sun elevation of 30°, the output gets brighter if the sun elevation is higher, and darker if it is lower.
Tips
- If the slopes are very gentle, you can try setting smaller values of the pixel size to enhance the contrast.
- To create an output like a topographic map, display the input (elevation data) with a suitable lookup table and superimpose the hill shade output:
- Run Hill Shade.
- Convert the input image to RGB.
- Use Process>Image Calculator with 'Operation=Average' to combine the input image and the shaded image.
- Typically, you will then want to enhance the colors a bit, using Image>Adjust>Color Balance.
- The image at the right shows an example, based on Space Shuttle Radar Topography Mission data of the area around Austria's highest mountain, the Großglockner.
- Such a superimposed map can be also loaded as 'Texture' when using the Interactive 3D surface plot plugin.
Version History
- 2014-Nov-22 Michael Schmid: enhanced version of the plugin released on the ImageJ mailing list a few days earlier
Usage
- Copy Hill_Shade.java into the ImageJ plugins folder or a subfolder thereof (make sure you name the downloaded file ”Hill_Shade.java”; uppercase/lowercase matters).
- Compile with “Compile and run”.
- Alternatively, directly save the compiled class file Hill_Shade.class into the ImageJ/plugins directory or an immediate subdirectory thereof. Again, make sure that you name the file correctly, uppercase/lowercase matters.
Related Links
- Find out the elevation and azimuth of the Sun (or Moon) at any day/time for a given location: http://aa.usno.navy.mil/data/docs/AltAz.php
- Get elevation maps for a given place at this website: http://srtm.csi.cgiar.org/SELECTION/inputCoord.asp


