Table of Contents
Morphological Segmentation
This plugin performs 2D/3D segmentation on grayscale images based on morphological operations and watershed transforms.
Introduction
Morphological Segmentation is an ImageJ plugin that combines morphological operations, such as extended minima and morphological gradient, with watershed flooding algorithms to segment grayscale images of any type (8, 16 and 32-bit) in 2D and 3D.
Authors
Ignacio Arganda-Carreras and David Legland, Modeling and Digital Imaging Group, Institut Jean-Pierre Bourgin, INRA Versailles, France.
Usage
Morphological Segmentation runs on any open grayscale image, single 2D image or (3D) stack. If no image is open when calling the plugin, an Open dialog will pop up.
The user can pan, zoom in and out, or scroll between slices (if the input image is a stack) in the main canvas as if it were any other ImageJ window. On the left side of the canvas there are three panels of parameters, one for the input image, one with the watershed parameters and one for the output options. All buttons, checkboxes and input panels contain a short explanation of their functionality that is displayed when the cursor lingers over them.
Image pre-processing: some pre-processing is included in the plugin to facilitate the segmentation task. However, other pre-preprocessing may be required depending on the input image. It is up to the user to decide what filtering may be most appropriate upstream.
Input Image panel
 First, you need to indicate the nature of the input image to process. This is a key parameter since the watershed algorithm is expecting an image where the boundaries of objects present high intensity values (usually as a result of a gradient or edge detection filtering).
You should select:
- Border Image: if your input image has highlighted object boundaries.
- Object Image: if the borders of the objects do not have higher intensity values than the rest of voxels in the image.
When selecting “Object Image”, an additional set of options is enabled to choose the type of gradient and radius (in pixels) to apply to the input image before starting the morphological operations. Finally, a checkbox allows displaying the gradient image instead of the input image in the main canvas of the plugin (only after running the watershed segmentation).
Watershed Segmentation panel
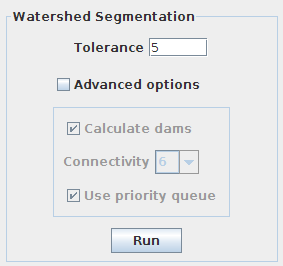
 This panel is reserved to the parameters involved in the segmentation pipeline. By default, only the tolerance can be changed. Clicking on “Advanced options” enables the rest of options.
- Tolerance: dynamic of intensity for the search of regional minima (in the extended-minima transform, which is the regional minima of the H-minima transform, value of h). Increasing the tolerance value reduces the number of segments in the final result, while decreasing its value produces more object splits.
- Calculate dams: un-check this option to produce segmentations without watershed lines.
- Connectivity: voxel connectivity (4-8 in 2D, and 6-26 in 3D). Selecting non-diagonal connectivity (4 or 6) usually provides more rounded objects.
Finally, click on “Run” to launch the segmentation.
If your segmentation is taking too long or you want to stop it for any reason, you can do so by clicking on the same button (which should read “STOP” during that process).
Results panel
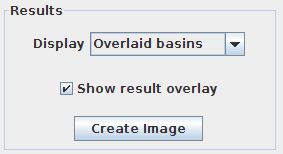
 Only enabled after running the segmentation.
- Display: list of options to display the segmentation results.
- Overlaid basins: colored objects overlaying the input image (with or without dams depending on the selected option in the Watershed Segmentation panel).
- Overlaid dams: overlay the watershed dams in red on top of the input image (only works if “Calculate dams” is checked).
- Catchment basins: colored objects.
- Watershed lines: binary image showing the watershed lines in black and the objects in white (only works if “Calculate dams” is checked).
- Show result overlay: toggle result overlay.
- Create image button: create a new image with the results displayed in the canvas.
Installation
Download the latest MorphoLibJ JAR into your ImageJ plugins folder and then restart ImageJ or simply apply the command Help>Refresh Menus. Then, you can call the plugin at Plugins > MorphoLibJ > Segmentation > Morphological Segmentation.
Download
The latest release can be downloaded from here:
http://github.com/ijpb/MorphoLibJ/releases
The source code can be found on GitHub.
References
- Soille, P., Morphological Image Analysis: Principles and Applications, Springer-Verlag, 1999, pp. 170-171.


